Pages

Showing posts with label Skin Studio By Megan. Show all posts

Monday, July 13, 2015

Do I really NEED a toner?


Do you really need a toner? That is a good question. Some toners in skincare lines are completely useless and can even be irritating. With a million things on our to do lists...a long skin care routine is the last thing we need. With previous lines I have used, I was never impressed with their toners, until I tried Skin Scripts. This toner makes me take the extra 3 seconds a day to give my face a nice spritz. 


Let's discuss toner and their benefits. Most toners help remove extra dirt, oil & makeup residue left behind after cleansing. Some toners are designed for certain skin conditions and ingredients to benefit each condition. My problem with lots of toners on the market is they are full of fragrances. Fragrance is a huge NO NO in skincare products and I always stay away from them. They irritate and clog the skin. Another issue with most toners is they are full of alcohol, "astringents" are what they are usually labeled. These dry out the skin and can cause irritation. 


I use to say just skip the toner...then Skin Scripts blew me away (again) with their Cucumber Hydration Toner. The smell is amazing and it has no fragrances. The cucumber extract gives this product that amazing smell. Every time I spritz this on a client, they always comment on how nice it smells. I can't forget to mention Skin Scripts is an all natural professional skincare line with amazing results. 

Functions: 
Re-hydrates the skin while improving cellular function and absorption of ingredients. Cucumber soothes and cools irritated skin. 

Recommended for: 
All skin types including dry and dehyrdrated. Provides probiotic support to skins acid mantle to support acneic skin. 

Benefits: 
-topically reduces discomfort and irritation
-assists in boosting hydration levels 
-balances surface lipids 

Active ingredients: 
 -heavy water: has a high molecular weight to deliver moisture into the skin, preventing trans-epidermal water loss & is hydrating
-cucumber extract: soothe and cool irritated skin
-hyaluronic acid: binds moisture to the skin 
-sodium PCA: boosts moisture to the skin
-borago officinalis seed oil: high concentration of gamma linolenic acid, an omega 6 essential fatty acid, anti-inflammatory 

How to use: 
AM & PM after cleansing spritz onto skin. Either spritz directly onto skin or apply with cotton ball. 

Tips & Tricks: 
-keep in the fridge for a cool spritz 
-use after applying makeup to set your foundation 
-spritz while at the pool, lake or traveling for a refresher 


Take home Skin Scripts Cucumber Hydration Toner for only $20 for a 3.3 oz bottle! 


Sunday, July 12, 2015

BENEFITS OF A FACIAL


Many clients who come in for microdermabrasion or other services will ask, what are the benefits of a facial? Well tonight's post is all about the benefits of a facial. A facial is a professional service to improve and rejuvenate the skin. Facials maintain the health and correct certain skin conditions through deep cleansing. The skin is the largest organ in the body, take good care of it.


Benefits of facials:

  • Deep Cleanses
  • Exfoliates
  • Increases Circulation & Detoxifies
  • Slows down pre-mature aging
  • Treats skin conditions such as dryness, oiliness, breakouts.
  • Softens wrinkles & aging lines
  • Clears up blemishes & minor acne. 
  • Relaxes the senses, nerves & muscles.
  • Speeds up the cellular turnover rate.
  • Promotes collagen production. 
So what exactly does a facial include? All of my facials are customized to each skin type. I use Skin Scripts products, a natural skincare line that provides amazing results. Ask me about a gluten free facial.I recently switched up my facials and clients are loving it. My facials typically include:


-Skin Consultation: After reviewing your client intake forms, we will discuss your skin concerns & expectations. 

-Deep Cleansing: Using a treatment cleanser, I cleanse the skin of dirt, oils & makeup. This allows me to analyze the skin and determine the best products and treatments for you. 

-Steam: Steam softens the skin and hardened oil in the pores, it is also hydrating. 


-Enzymes: Depending on your skin type & conditions, I will choose an enzyme tailored to your skins needs. Enzymes are mild, natural, and great for sensitive skin. Enzymes are ingredients designed to dissolve keratin proteins on the surface of the skin, resulting in exfoliation and softer, smoother skin. I love skin scripts enzymes. They are fruit based enzymes that smell amazing.

-Exfoliaton: Speeds up cell turnover, dead skin cells shed naturally every 28 days (this process slows down as we age). This helps rid the skin of the dead cells to reveal healthy fresh skin. Exfoliation is done manually through a scrub or microdermabrasion or chemically with a chemical peel, depending on your skin. 


-Ultrasonic Skin Scrubber: This little tool is amazing. Check out my blog post here ULTRASONIC SKIN SCRUBBER BLOG 

                                                    Here is its three functions:
1. Soft Peel & Cleansing Mode: During the first step, the machine is loosening dead skin cells.The peeling step of this process pulses water quickly into the skin to bring out trapped dirt and oil.


2. Nutrition Mode: During the second phase of ultrasonic, the skin scrubber penetrates product deeper into the skin. This allows the product to reach deeper into the skin than it normally would. 


3. Firming Mode: During the final step of ultrasonic, the machine allows the esthetician to tone and lift the face. This results in elasticity to the skin, eliminates fine lines & wrinkles, and shrinks the appearance of pores.

-Massage- Facial massage is relaxing and increases circulation.

-Mask: Lowers the temperature of the skin, reduces redness, hydrates & delivers key ingredients. 


-Products: Customized to your skin type, eye creams, serums and a moisturizer will be applied.


-Protect: You will always leave with sun protection at Skin Studio By Megan.


After the facial we will discuss recommendations for future skin care treatments and products. Remember good home care is necessary for optimal results. One facial is not a miracle in an hour, but it will promote healthy, glowing skin. I recommend a professional exfoliation treatment (facial, microdermabrasion, chemical peel) every 4-6 weeks. As I stated earlier, our skin cells shed every 28 days, this helps remove dead skin cells and rid the skin of impurities. 


I found this on pinterest and shared it on my facebook page awhile back & I just love it. 


Tuesday, June 9, 2015

Latisse & Long Lashes


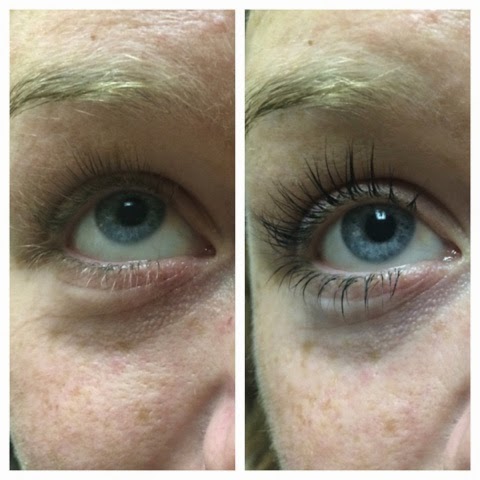
Let me start by saying I LOVE LATISSE. You know those people with amazing natural lashes? Well I am not one of those blessed beauties. My clients always ask me a billion questions about Latisse so I thought I would clear up some confusion in a post. Here are my most frequently asked Latisse questions. I have used Latisse on and off for years. 


Here is a 4 week before & after of my lashes with Latisse. It's not the greatest before & after but you can see those lashes growing. Side Note: my mascara is super clumpy...I was using cheap mascara (yikes)

Won't that change my eye color? 
The answer is NO. This impression is from when Latisse was originally used for Glaucoma patients, it was injected directly into the eye. Since Latisse has been used externally for lash growth, there has been NO changes in eye color of patients. 

Do I have to get a prescription?
Most med spas or plastic surgeons offices will just have you sign a consent form before purchasing Latisse. 


Do I have to use it forever? 
Yes. Lashes have a growth cycle and do fall out. Once you stop using Latisse & the lashes that grow in will be your regular lashes. However, after I use Latisse for awhile and get my lashes the length I prefer, I only use it every 3 nights to save some product & money. 

If I use it twice a day will they grow faster?
No. However I have heard people swear by using it twice a day the first week. The rep for Latisse told me when I first got into the medical field that it will not make them grow faster. 

How long will it take to see results? 
Most people start to see a change around week 4. 

It is so expensive... how long does it last? 
The 3 ml bottle lasts me anywhere from 6 to 8 weeks. I have learned a few tips & tricks to save my precious prescription.
I always put the one drop of Latisse into the bottle cap. Then I dip my brush into the solution. I swipe over both eyes on the top lash line. I use the same applicator for both eyes to make my applicators last longer. I would NOT advise this if you have any kind of eye infection. 


Are there side effects? 
Working in the medical field prior I have sold lots of Latisse. The only complaint I hear is some people have redness around the lash line. 

Latisse vs. Eyelash Extensions 
I say Latisse all the way. I have performed and received eyelash extensions. Even with the proper technique the extensions can still be harsh on the lashes. Think about it...they are using a glue and eyelash extension applied to your natural lash. It definitely weighs down on your lash. Many of my clients have come to me for advice to grow lashes after years of eyelash extensions. Extensions are lots  of maintenance people...like getting your nails filled in. I think Latisse is a much safer alternative for long luscious lashes. 


Side Note: Use Latisse to fill in your eyebrows from over tweezing. It works like a charm. 


Contact me at skinstudiobymegan@gmail.com to find out the best deals on Latisse in Lexington. Many places have buy the 5ml get the 3ml free rebate going on currently.  


Tuesday, June 2, 2015

Chemical Peel 101 & Giveaway


It amazes me how many clients are scared of chemical peels. I think we have all seen the Sex And The City episode where Samantha's skin looks crazy post peel. I blame that episode for the fear in many clients. I also think the name "chemical peel" scares people off a bit. Tonight we are going to discuss different types of peels & why you should try one at your next appointment. I love alternating clients between peels & microdermabrasion...it is good to switch things up! 


Many clients don't understand there is generally 3 levels of peels...light, medium & deep. Being acne prone and working in the medical field I have tried just about every peel ranging from no peeling to my face falling off in sheets. I have found I have better results doing light "lunch-time" peels more frequently rather than a series of deep peels. Not to mention the down time is much better. Let's discuss chemical peels. 


Benefits of chemical peels: 
-improves skin texture
-reveals healthy glowing skin 
-removes dead skin cells 
-preserves youthful appearance 
-increases moisture retention
-improves skin barrier function 
-stimulates collagen & elastin
-reduces surface pigmentation 
-reduces fine lines & wrinkles 
-reduces acne & acne scarring 


Downtime: 
All the peels I perform at Skin Studio By Megan are "lunch-time" peels. They can take anywhere from 15-30 minutes per treatment. Lunch time peels speed up renewal process on top layer of skin. The downtime is very minimal if any. The skin may appear red after treatment and that will fade within 30 minutes to a few hours. No makeup for at least 2 hours. You also may feel tight & dry for a few days. A few of my peels have minimal flaking for 3-5 days. The downtime is similar to microdermabrasion. 


Types of peels: 

Lactic: 
milk-based 
hydrating & exfoliating 
normal-dry
sun damage 
hyper pigmentation 
lightening 

Glycolic: 
-dissolves desmosomes that hold skin together
-normal, oily, acneic & dry
-minimizes poor size 
-mild-moderate acne 
-pigmentation 

Salicylic: 
-normal, oily & acneic 
-resurfaces & refines skin & pores
-dries up oil
-excellent antioxidant 
-inhibits inflammation 

TCA:
-re-texturizing 
-melasma 
-acne 
-hyper pigmentation 
-evens skin tone 

These are just a few popular peels at Skin Studio By Megan

Remember there are tons of different peels out there. Just because you had a glycolic peel at one office doesn't mean it will be the same at another. Peels vary in pH levels & percentages. 


Giveaway: 
I am giving away a FREE chemical peel to one lucky winner. Here is how to enter. Like the giveaway on Instagram or Facebook. Comment which peel you think is best for your skin type. Share this post. (If private comment that you shared so I will know). The winner will be chosen Monday June 15th. Tag a friend on Facebook or Instagram to be entered twice. 


Skin Scripts peels are good for all Fitzpatrick types. Most companies peels are not recommended for darker skin types. 


Here are some testimonies from clients about chemical peels.

 "Best chemical peel experience ever! I've always been so scared to get one done but Megan did an amazing job my skin has never looked or felt better!" -Devan W

"I just wanna take the time to give a huge shoutout to Megan Johnson!!!!!!!! Received a chemical peel and different sorts of her fabulous treatment two days ago, and my face already looks and feels so much better! Thank you Megan you are amazing!!!! If you are having troubles with your skin I recommend setting up and appt. with her!!!" -Hannah G


Thursday, April 9, 2015

Why you should toss your St. Ives Scrub

After my post on why you should toss your cetaphil (check it out HERE) I decided to make a series on terrible yet popular over the counter skin care products. Tonight I am breaking down why you should throw away the ever so popular St. Ives Scrub.


This product claims to be "all natural" and hypoallergenic but have you looked at the actual ingredients? If you have a bottle of this terrible scrub I am assuming no....go ahead and toss it in the trash now. I like to think of this product as taking glass putting it in a blender then rubbing it on your face. Lets break down a few of the ingredients.

The walnut shell powder creates microscopic tears in the top layers of the skin. The granules are jagged making the product scratch the skin not exfoliate the skin. This makes it perfect for bacteria to clot. 

This product is full of ingredients that have fragrance....very irritating to the skin.

A lot of the ingredients are highly comedogenic for example ceteareth-20 an emmolient. 

Propylene glycol leaves a film on the skin and is toxic.

Most ingredients are very irritating to the skin.

They claim to be "all-natural" (which means nothing but a marketing ploy) yet fail to mention synthetic surfactants, emulsifiers, preservatives & fragrances. Not so natural is it?

This product is seriously damaging the skin. The redness and tearing is at a microscopic level which cannot always be seen or noticed when using. This product causes premature aging, discoloration, scarring & broken capillaries. It also makes the pores appear larger. So please do your skin a favor and TOSS the St. Ives.


Monday, April 6, 2015

Eyelash & Eyebrow Tinting


With summer slowly but surely approaching I thought it would be a perfect time to do a post on eyebrow and eyelash tinting. This is my most popular add on service...it's quick, safe & easy on the wallet! Biosmetics Intensive tinting only uses natural ingredients (like sunflower oil) and contains no coal tar or other prohibited materials. The tinting extends the full length of the eyelashes which may have been faded by sun and water over time. The color lasts anywhere from 4-6 weeks. This is perfect to enhance your natural beauty & great for no make up days at the pool, lake & beach!

Here are some of my clients before & after pictures:


This month I am running a special on tinting. Get both your eyebrows and eyelashes tinted for only $30 (save $5). The appointment only takes around 15-25 minutes. To take advantage of this offer text or call 859.619.2155. 


Sunday, March 29, 2015

Pinterest Skin Care DONT'S


 I am a HUGE pinterest fan, I think it is a fabulous app/website...many great ideas come from pinterest. Although there are some things I see on pinterest that make me cringe, and skincare treatments & products are one of them. Please people be careful what you do/put on your skin.Today I am going to bust some of these DIY pinterest skincare myths. 


Pictured above is a DIY microdermabrasion...microdermabrasion is mecahincal exfolation using a diamond wand tip or crystals. There is nothing you can do at home that will provide benefits of a microdermabrasion. I laugh so hard on the inside when my clients tell me they have had microdermabrasions but not done professionally. The biggest one I hear is Mary Kays microdermabrasion (not knocking Mary Kay I love some of their products) & I even sell an exfolationg scrub called Nitty Gritty that has the same crystals used in microdermabrasion. These products have NO comparison to a microdermabrasion treatment done by an esthetician. Read more about microdermabrasions in an older post microdermabrasion blog  


Here are some ingredients found in various DIY skincare treatments & scrubs that are harmful to the skin & here is why:

Baking Soda- Baking Soda has a pH of 9 which is way too alkaline for the skin. This causes moisture loss & strips the skin of its natural barrier. 

Lemon- Lemon is known all over pinterest for brightening the skin & clearing blemishes. However the pH of a lemon is only 2, throwing off the pH balance of the skin & is very irritating. 

Toothpaste- Toothpaste is known as a great DIY spot treatment for pimples...but it is actually harmful. This strips the lipid barrier of the skin. Applying toothpaste directly to your skin is very drying & irritating. This can also cause pigmentation & acne scars. Instead look for a spot treatment containing benzoyl peroxide or salicylic acid. My favorite is Skin Scripts blemish spot treatment.  


Vasoline- Vasoline is recommended for dryness but I recently saw a blackhead remover using vasoline. Vasoline is too occlusive for the skin and is very pore clogging. 

Sugar- Sugar is in a lot of DIY scrubs & exfoliants. However sugar is too rough & has uneven jagged edges that can actually tear up the skin. 

Coconut Oil- I am a big fan of coconut oil, although it should never be used by someone with oily acne prone skin. Oils are a big fad in skincare and yes oil does dissolve oil, but coconut oil is not good on acne prone skin unless you want a breakout. 

Rubbing Alcohol- Rubbing alcohol is too drying for the skin to be used daily. It will cause a buildup of dead skin cells.

Milk- Lactic Acid derives from milk but that doesn't mean you should apply milk directly to the skin. Milk can actually spoil on your skin & it is not strong enough to deliver any lactic acid. 

Egg whites- Egg whites sometimes contain salmonella, if you ingest any of this you can get sick. 


Another no no I have seen on pinterest is making your own products & sunscreens. Most of us are not chemist so please do not try making your own products. You most likely will do more harm then good to your skin. Leave it to the professionals people. 


Monday, March 16, 2015

Why you should toss your Cetaphil

Cetaphil is not the holy grail of cleansers it is made out to be. Actually you should throw away your Cetaphil cleanser. 

Cetaphil doesn't have a SINGLE anti-aging ingredient...or ANY beneficial ingrediets for that matter. This cleanser that is so well known has no benefits for your skin. This product claims to be "gentle & non-irritating" but lets review its ingredients. Oh wait there is only 8 ingredients.

1. Water
2. Cetyl Alcohol (fatty acids)
3. Propylene Glycol
4. Sodium Lauryl Sulfate (surfactant, strips dry skin & irritating)
5. Stearyl Alcohol (fatty acids)
6.Methyl Paraben (preservative)
7.Propylparaben (preservative)
8.Butylparaben (preervative)

The three parabens listed are actually on the list of cosmetic ingredients to avoid.

So why are so many dermatologist recommending this cleanser? Politics of course....dermatologist have a great relationship with Galderma the company that makes Cetaphil & they send thousands of samles to dermatologist. Another reason this is recommended is it containts no artificial fragrances & dyes. Dermatologist do not have time to research over the counter products to recommend to their clients. Dermatologist also know more about skin care conditions then skin care products. 

This cleanser may not irritate your skin but it is most certaintly not helping your skin. Talk with your esthetician or dermatologist about cleansers that are actually beneficial for your skin. 

Ladies toss away the Cetaphil and start using cleansers with anti-aging ingredients that help your skin.

Happy Monday.


Tuesday, March 10, 2015

Layering Skin Care Products


After several questions this week from clients on layering products I decided to do a post on this topic. Many people have no idea which products to apply first or last. Which order you apply your products makes a huge difference in the potency of products. 

1. Start with a clean canvas by washing your face.
2. Serums (thinnest) should be applied first. This is because these products deliver the most active ingredients. If you apply a heavy thick moisture first, your active ingredients cannot penetrate as deep.
3. Target treatments should be applied next (acne spot treatments, lightening tx, eye creams, etc.)
4. All over treatments.
5. Moisturizer
6. SPF

Remember thinnest to thickest is the general way to go when applying products. Your skin care routine doesn't have to be complex. Always consult with your esthetician or dermatologist on your daily & nighttime skin care routine. Some products may dilute others and some products when mixed can have bad reactions. This is why you need to go over your products and routine with a professional! 

Give the skin a break when applying products, give each product enough time to dry. Try applying one product then make your morning coffe or brush your teeth before applying your next product.

Don't forget our skin repairs itself at night. During this time is when re texturing products work best. Make sure you are using a form of retinal at night.


NEVER forget your daily SPF


If you have questions about your skincare routine feel free to message me at skinstudiobymegan@gmail.com 


Saturday, March 7, 2015

Skin Care Ingredients 101

SKIN CARE INGREDIENTS 101

Many people know certain ingredients are important in skin care but aren't really sure what they mean. Retinols, Salicylic Acids, Enzymes...we know we need to look out for these products...but do you know which ingredients are best for your skin? Here is a quick breakdown of common ingredients found in products & treatments and which skin type they are most suited for.

Antioxidant- Antioxidants are perfect for EVERYONE. Antioxidants prevent damage of free radicals. Free radicals are chemically unstable molecules caused by environmental pollutants and UV exposure which cause damage to the skin. Basically antioxidants fight off the bad guys. I love getting my antioxidants in with my Vitamin C serum & drinking lots of antioxidant packed foods & teas. 


Enzymes- Enzymes are mild, natural, and great for sensitive skin. Enzymes are ingredients designed to dissolve keratin proteins on the surface of the skin, resulting in exfoliation and softer, smoother skin. I love skin scripts enzymes. They are fruit based enzymes that smell amazing. I love to add them before a microdermabrasion or chemical peel. Here is a guide to Skin Scripts Enzymes that I use in the treatment room. 


Salicylic Acid- This ingredient is perfect for acne prone skin. It is anti-inflammatory &  great for reducing the appearance of large pores. Salicylic Acid penetrates into the pore dissolving dead skin cell buildup and promoting cellular turnover. However this is not suitable for dry skin since it is oil based. I like to use a Salicylic Acid based cleanser (Clinical Care's Cleanszit) along with monthly Salicylic Chemical Peels to keep oil and breakouts at bay. 


Benzoyl Peroxide- An acne fighting ingredient that is used to dry and exfoliate. Benzoyl Peroxide releases oxygen which helps in killing the bacteria that causes acne. I love to spot treat with Benzoyl Peroxide (since it can be drying I don't like to apply it all over my face). Be careful B.P can stain your sheets & pillow cases. 


Hyaluronic Acid- Hyaluronic Acid is suitable for all skin types. It binds moisture to the skin for an instant plump. My newest HA product I am loving is Skin Scripts hydrating ageless serum. Skin Ceuticals hydrating B5 serum has to be my all time favorite however. A good HA serum is perfect for extra hydration and preventing TEWL (transepidermal water loss). Skin scripts hydrating ageless serum can be applied all the way up to the lash line, preventing & helping milia. 


Lactic Acid- Lactic Acid is a derivative from milk. It is suitable for sensitive, dry & mature skin. It is a hydrating exfoliant that draws moisture from the dermis & surface. This is also a good product for a person with dry skin & acne. It lightens & brightens the skin.


Retinol- A form of Vitamin A to desquamate skin cells. It increases cellular turnover, increases collagen, evens skin tone, clears up acne impactions. Retinol is my favorite product that EVERYONE should be using. Many clients say retinols are too strong on their skin, however decreasing your usage or the percentage of active retinol in the product can help sensitivity. There is usually a form of retinol for everyone (even very sensitive skin). 


Glycolic Acid- This acid dissolves desmosomes between cells to keep skin cells exfoliated. This is a great solution to help purge closed comedones. It clears blocked pores, smoothes texture, and removes hyper pigmentation. I love Glycolic Acid and usually suggest Glycolic Peels to all my clients. 


I am currently LOVING these skin script retinol & glycolic pads. They retail for $22.50...could that price get any better? I have been testing these out for the past few days & I have decided to bring some in to retail so I can share the love with you all! These come with 50 pads that break up surface oil to refine pores and reveal fresh, healthy skin. Kojic and arbutin lighten sun spots and scars left from blemishes. Clear up those left over acne marks, current breakouts & pigmentation while stimulating collagen & elastin for fine lines & wrinkles. Miracle product?...I think so!

Of course there are TONS of ingredients to look out for in skin care products. These are just a few common ones I get questions on a lot. If you have any questions on skin care products or ingredients feel free to ask me. Email me at skinstudiobymegan@gmail.com 


Friday, March 6, 2015

3 WAYS TO STOP THE SIGNS OF AGING ON YOUR HANDS

Here are 3 helpful tips on how to stop the signs of aging on your hands. I cannot stand when I see an older woman with a face free of wrinkles and her hands are covered in sun damage & wrinkles. When guessing the age of someone I immediately check their hands and chest as well as face. With my 24th birthday coming up this month, I have been thinking about what else I need to add into my skincare regimen for anti-aging purposes. I have always used anti-acne products and some do contain anti-aging properties, however I am just using these on my face. I need to start focusing on neck, chest, and hand protection as well. If you are in your twenties or even in your sixties, you can start applying these tips to your regimen today. 


1. SUNSCREEN- All day every day people. Like I mentioned in my post on winter skin 
( http://skinstudiobymegan.blogspot.com/2015/02/winter-skin.html ) you need to wear sunscreen even in the winter. Applying sunscreen to your hands will prevent sun damage and pigmentation problems.

2. Microdermabrasion & Chemical Peels- This is the easiest and quickest service to add on while you are getting a facial, chemical peel, or microdermabrasion...not to mention good on the wallet. I charge $10 to add on microdermabrasion or chemical peel on the hands during a treatment. I recommend doing this about once a month. This is great to start even in your twenties. The best way to avoid pigmentation is preventing it. Getting regular mechanical or chemical exfoliation treatments will help with pigmentation as well as fine lines & wrinkles.

3. IPL ( Intense Pulsed Light )- I would recommend IPL if you already have sun spots on your hands. If they have been there for quite awhile, this is your best option for removal. IPL feels like a rubber band snap. Later I will write a post all about IPL. I love IPL treatments. Your brown spots on the hands after treatment will appear darker then flake off...then nothing but amazing results with no downtime.


Don't forget to always apply a moisturizer to your hands as well as topical antioxidants(love to put my vitamin C serum on my neck, chest & hands). Start using these tips today to keep your hands appearing youthful! 


(photo's not mine)

Saturday, February 21, 2015

Winter Skin

Winter means one thing...dry skin! All of my clients, family & friends have been asking tips & tricks to hydrate their skin this winter. In Lexington, KY we have been snowed in all week! This has definitely wreaked havoc on clients skin as well as mine. Here are just a few tips to beat those winter skin blues. Don't forget you can always give yourself an at home facial....I will list steps for that as well. So make yourself a hot cup of tea and enjoy this post.

1. Moisturize- I cannot stress this enough. I have so many clients complain about dry skin and they are only moisturizing at night...HELLO. Make sure you are at least moisturizing twice a day. Also make sure you are keeping up with your exfoliation treatments. If you remove the dead skin cells sitting on top of the skin, you will maximize your moisturizer. Try switching from a gel cleanser to cream cleanser or switch to a more hydrating moisturizer. 

Instead of your normal moisturizer try this


2.Exfoliate- Exfoliation is the key to healthy, youthful & clear skin. Make sure to keep up with your monthly microdermabrasions, peels & facials especially in the winter. Products will penetrate much deeper with clean, clear pores. I love Nitty Gritty from Clinical Care Skin Solutions. This highly effective formula polishes skin with Aluminum Oxide crystals, which are the same crystals used for microdermabrasion. If you are acne prone, try Scrubzit from the same company. 
Another great way to exfoliate is using a Clarisonic brush.Sure they are a bit pricey for some people, but they are amazing & definitely worth the money. I have had mine for years & it is still in perfect condition.

3. Sunscreen- Yes you need to still wear sunscreen EVERYDAY in the winter. It amazes me everytime someones says they don't need to wear it during the winter. The UV rays don't hibernate, they actually reflect off of the snow. 

4. Bath/Showers- Make sure you are using lukewarm water when taking a bath/shower. Hot water strips the skin and hair of natural moisture & oils. I am guilty of taking extremely hot showers. Make sure you are using an exfoliant not only on your face, but body as well. My favorite cheap body exoliant is Dr. Teals eucalyptus epson salts. You can get this at kroger, target, etc. Mix some in a warm bath or mix a handful into your favorite body wash and gently scrub into skin. 
5. Lips- Nothing is more annoying, painful & unattractive then chapped/cracked lips. Many chapsticks are actually drying to your lips, it feels good temporary but isn't healing long term. I have two favorites for winter lips. The first is hydrating with aquafor. I absolutely love this stuff. Every time I have a laserpeel or deep peel, this is my go to for healing my skin. This stuff is also great for chapped lips. If I have dry skin patches I always moisturize with this.
My second favorite is Clinical Care's Sugar Lips, its a lip exfoliant and plumper. Not to mention it tastes amazing. My husband is the chap stick king and he loves this stuff. 
6. Hydrate- I know I say this all the time but I cannot stress the importance of hydrating your body & skin. Keep a water bottle with you at all times. I used to track my daily intake when I first started to drink more H20...there are a few good apps I used to keep track. Also warm up this winter with a cup of hot tea. My favorite is Yogi Skin Health (for normal skin) and Yogi Skin Detox (for acne-prone skin). Last night I tried Aloe Water for the first time & was blown away how yummy it tasted (I hate coconut water). I love to spice things up with lemon water as well. 

At Home Facials- Try giving yourself an at home facial. Start by cleansing your skin using small circular motions. Next use your favorite exfoliant (Nittygritty, Scrubzit, clarisonic brush). Again, use small circular motions working the exfoliator into the skin. After rinsing, apply your favorite mask. While the mask is sitting on the skin, dampen a facial washcloth & heat in the microwave. I warm mine up in 30 second intervals, make sure to check the temperature before putting on your face. Apply the steam towel & let sit on skin for 10 minutes (this will help remove your mask). If you cannot remove the mask completely, cleanse the skin again. Next apply your serums (Vitamin C, lightening creams, etc.). Apply your moisturizer & follow up with a sunscreen. 

I hope you enjoy these winter skin tips & tricks. If you have any questions regarding your skin type & treatment, message me at skinstudiobymegan@gmail.com


Thursday, February 19, 2015

Bridal Skin Tips

With Christmas and Valentine's Day being over...that means one thing....ENGAGEMENTS! I absolutely love everything about weddings and engagements. That is probably because I just got married this past August and I am so sad it is all over. With that being said, I do NOT miss the stress of planning a wedding, the sleepless nights, and the stress of stressing over my skin. I have always had oily, acne-prone skin. I have spent...aka my parents have spent thousands of dollars growing up on skin care products, prescriptions & treatments. Having clear skin on my wedding day was a miracle by the skin gods & also took a lot of work and timing on my end. This post is just some quick tips to clear, glowing & healthy skin on your big day.


  • Hydrate: Drink plenty of water to flush out toxins & hydrate your skin. Another great way to hydrate is tea. My favorite is Yogi Skin Detox for acne prone skin or Yogi Skin Health for normal skin.
  • Avoid aggressive treatments one-two weeks prior to wedding date.
  • Avoid changing your skincare products 2 months before wedding. Most products take at least 4-8 weeks to start seeing results. Switching products can also lead to irritation and blemishes. Have a consultation to decide what products your skin needs. Before your wedding it is a necessity to invest in good quality skincare products. Spend a little extra money on pharmaceutical grade products...your skin will thank you.
  • Exfoliation is key to healthy, glowing, clear skin. Bi-weekly professional exfoliation treatments are recommended for several months leading up to the big day.
  • Ice cube facials nightly at home. Wrap an ice cube in a paper towel and gently massage over face. This helps reduce redness, blemishes, improves circulation, reduces puffiness & appearance of pores and gives the skin a healthy glow. 
  • Add Vitamin C serum to your at home skincare regimen. It lightens, tightens, and brightens the skin. It gives the skin a healthy glow.
  • Use an Epson salt scrub for your body. This is great for dry elbows and knees. My favorite is Dr. Teals Eucalyptus Epson salts (I get mine at Target). You can mix some in your Jacuzzi or mix a handful with your favorite body wash and gently massage into skin. 
  • Clean makeup brushes with an antibacterial soap frequently.
  • Wash pillow cases frequently.
  • Add a multi-vitamin or Vitamin B & C. I love the Vitamin B-complex & Vitamin C gummies...so tasty!
  • The week of your wedding get a micro-current facial. This is a perfect day of treatment to de-puff the skin, get an instant lift & glow. No downtime or side effects.
  • If you have certain concerns (pigmentation, acne, rosacea, unwanted facial hair, etc.) discuss with your esthetician how to address these concerns. 
  • Lasers and botox need to be addressed early and timed out before your wedding to avoid side effects on your big day.
  • If you struggle with acne-prone skin consider talking with your doctor or dermatologist about getting a prescription antibiotic to avoid any blemishes on your big day! I have had great results with the antibiotic bactrim. Quick results and no side effects. Everyone reacts differently with medications so discuss options with your doctor. 
  • Test different foundations that are best for your skin type. I used Dior Airflash on my wedding day ($62 available at Sephora). I absolutely love the coverage of this foundation and use it on special occasions because it usually clogs my pores. However my best friend (esthy & manager at Sephora) recommended I try their version Sephora Collection Perfection Mist Airbrush Foundation...I have to say it is WAY better than Dior's version and is only $28. The coverage is fantastic, my pores appear much smaller & I don't appear as oily throughout the day. I am in love with this foundation, and the best part is it doesn't clog my pores.
I hope some of these tips & tricks will help you get your skin wedding ready! If you have any questions or concerns on your skin email me at skinstudiobymegan@gmail.com. I would be glad to help! Here are some pictures from my big day. I miss it SO much. 


Venue: The Thoroughbred Club of America
Hair: Pink Lou Lou (Allison Johnson)
Makeup: Caroline Clay
Photographer: Chance McCool
Videographer: Hannah Johnson

check out this sweet video my friend Hannah Johnson made of our big day...I tear up everytime I watch it